Wednesday, September 17, 2008

I Just Have to Say...

Yesterday, when I got home from work and checked out the new hardware for my craigslist bureau, I was SO impressed.

I ordered these drop pulls from http://www.qualitybath.com/ and not only did they have really great customer service, but the product I ordered was well-made and affordable. None of that hollow- in-the-back cheap hardware crap. These are really nice, heavy, quality pulls. I can't speak for every item they carry, but my personal experience with Quality Bath was great and I wanted to pass it along (no, I don't work for them :) ).

And, in keeping with my usual "biting off more than I can chew" philosophy, I picked up a little something for my next project:
Sorry the pic is so bad. I took it early this morning, in my basement, in zero natural light and then overcompensated by lightening the hell out of it with Photoshop.

I have wanted one of these chairs since BEFORE Pottery Barn made them popular - namely, since I saw Diane Keaton sitting in one in her lovely beach house in Something's Gotta Give...

Could I be any more obsessed with this beach house? I know I'm not the only one. There should be meetings for this kind of obsession. Anyway, I found this chair at Salvation Army for $15. But, I think it's pretty old (albeit very solid) and I'm feeling kinda guilty about painting it. Anybody think I shouldn't? I did want one to paint a lighter color, but the last thing I wanna do is ruin an antique. Guess I'll try to find out how old it is before doing anything with it.

The Making of an Au Pair Suite, Vol I

As I said in a previous post, I should have started this blog back in '06. I'd really like to catch everyone up on our progress thus far - which is a pretty big undertaking. Intimidating, even. (Editor's note --- This is the point at which I usually save this post as a draft and don't look at it again for a month - but NOT TODAY! Today, this post becomes a reality!) Alrighty, so, I guess the best place to start is the beginning.

We closed on the house on April 28, 2006 (which just happened to be my birthday - pretty cool, eh?) and with that, so began construction. From the time we had first seen the house, our plan was to convert the walk-up attic into an au pair suite of sorts. For our au pair, you ask? Why, no. We don't actually have an au pair and unless I have a very rich, very old uncle I don't know about, we won't have one anytime soon. Basically, the au pair suite would act as a place a sibling or maybe an elderly parent could stay if the need arose. At 3,000 square feet, we just didn't need so much house to ourselves, and so the au pair suite was born.

On the day we closed, the attic was NOT pretty. Blue walls with some kind of cow border (yes, a cow border), hardwood floors that had been spray-painted black (yes, spray-painted black) and a crap load of old bibles. Initially, I was going to do a "before and after" post today, but the sheer amount of information involved with the attic renovation makes that unrealistic. Soooo, I figured I'd do several smaller posts, to make the story a bit easier to follow.
Basically, the attic consisted of three areas. Area 1, by which you enter the attic is now the living room. Area 2, a finished room off of Area 1 is now the bedroom and Area 3, a large, unfinished space (rafters showing, subfloor only) was divided up into the galley kitchen, bathroom and hallway.
For this post, I'm gonna concentrate on Area 3, as that is where the biggest transformation took place. For the sake of time and because this is MY blog and not my husband's blog, I'm not even gonna attempt to explain all the construction-type technicalities of the attic renovation. Instead, a bunch of pics in chronological order, together with my witty captions and pithy observations will have to suffice...
Okay, these pics give a view into Area 3, the unfinished portion of the attic that will become the kitchen/bathroom/hallway before your very eyes! All pics show the same window, for reference. Notice the lovely cow border in pic 2.

And in this pic, we have framing! The framing is outlining the bathroom, which will be behind the galley kitchen. The hallway is to the right.

This is another view during framing, looking down the small hallway that leads to the bathroom. You can see that the shower is now installed. You can also see the doorway leading to the bedroom on the right.

Annnd, we're on to drywall! Exciting stuff ain't it? The kitchen is really starting to take shape now. Some lower cabinets are tentatively placed.


The cabinets are in! Some painting has been done and the floor has been laid! This view shows the storage closet at the end of the hallway. The door to the bathroom is opposite the closet.

And here's a better shot of the cabinets and floors...still a mess, but getting there.

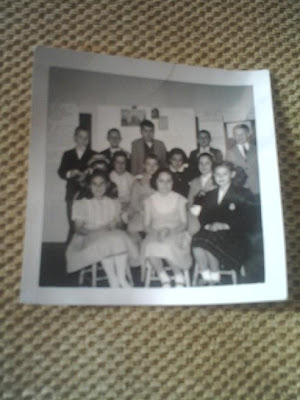
Just for fun, here's some of the stuff we found in the attic... an old Sunday school class pic from '58 (I'll have to scan it sometime) and a couple of really old keys. Many of the doors in the house still have the old keyholes in them. I'll have to check them against the keys to see if we have any matches.

That's about it for Vol I of the Au Pair Suite series. Stay tuned for "after" pics of the kitchen, bathroom and hallway...all on tomorrow's Our Big Yellow House!

Tuesday, September 16, 2008

Quick Update

Our floor guys are starting earlier than expected - this Thursday! Can't WAIT to share those "after" pics. In other, slightly less exciting news, my pulls for the craigslist bureau arrived. Guess that means I better get movin on the paint (AFTER Cullen is in bed for the night).

It is flippin FREEZING in my office right now. I can barely type. Send coffee. Thanks.

Monday, September 15, 2008

More Than Just a Good Cause

I know, I know, times are REALLY tough for everyone right now. But, I have to ask, soooo...


If anyone is at all interested in donating to a WONDERFUL CAUSE or, if you'd like to join us on our 5K Walk, please contact me via gmail.


This website gives all kinds of info relative to our fundraising efforts:


www.granaraskerry.org


(notice Mr. Finn making a cameo on the home page - up on his Dad's shoulders)


Not only will you endear yourself to me, personally, forever, but you'll also be helping one of the coolest ladies around, Kathy Granara Skerry. Even a dollar makes a difference!

Thanks!

Need Help! Am Cross-Eyed

You've probably seen my formal living room/dining room before...


The paint color is much more accurate in this pic:


While it's not 100% finished, it's close. As far as the floors go, a quote has been accepted, a job given and a start date promised. Namely, next Monday. With the end in sight, it's time to consider the "fun stuff." Which of course means interior decor.

It'll be a while before we have any real amount of money to spend on living room furniture. But the dining room, well, we already have our table and I am going to paint and reupholster some old chairs. Which brings me to the Waverly fabric to which I have recently become very attached:

Now, should I be bold and use pear?

Be safe and choose black (or dark brown)?


Or is this the perfect opportunity to try out some of that coral I've been thinking about?


One of my favorite versions of this fabric is navy - but I'm having a hard time envisioning navy blue as an accent color in this room. Anyone want to talk me into it?


The fabric will be for the seats of the dining room chairs, and probably for some pillows in the living room.

I have been staring at this fabric, trying to pick a color for the last two days. If you have an opinion, please cast your vote!

Saturday, September 13, 2008

All That Remains...

Here are some pics of the floor, post dry ice experiment.

This is the view into the foyer from the formal livingroom/diningroom:


The foyer staircase landing:


A close up of the "grid" left by the 9" x 9" tiles. This tar paper currently covers the hardwood in some spots, but will be sanded off easily when the floors are refinished:


The tool Mike used to scrape the tiles off after they were treated with the dry ice:


Remnants of the asbestos tiles after they "shattered":


Originally, we thought the hardwood in the foyer and livingroom/diningroom were the same. Now, it looks like they are a little bit different. The width of the foyer planks look slightly bigger. This is a close up of the foyer floor:


And a close up of the livingroom/diningroom floor:

The view into the livingroom/diningroom (thought this would make a nice "before" pic after our floor guys work their magic):

Friday, September 12, 2008

It Worked! It Actually Worked!

Yesterday afternoon, Mike set out to pick up a large amount of dry ice in a last ditch effort to rid the foyer of some extremely stubborn asbestos tiles. We had heard rumors about this working, but couldn't find any first-hand accounts - so we were a little nervous. Well, by the time I got home from work at 5:00, all signs of the tiles were GONE!!! There were still a few "freeze" marks on the floor when I arrived - I had just missed all the fun.

Mike and my dad had spread the dry ice out in a row and let it sit for about five minutes, while uneasily watching the stuff smoke like crazy. Then, when they scraped up the tiles, they just shattered like glass! Came right up as if they hadn't even been glued down! They kept repeating this method, row after row, moving the "line" of dry ice back further and further until the whole foyer (approx. 150 sq. ft.) was cleared. We used about 100 lbs. of it, altogether.

I forgot to take some pics this morning, so I'll take some when I get home tonight.

As an added bonus, Mike said the dry ice method really cut down on the airborne dust BIG TIME.

We're calling this experiment a SUCCESS!